Inspect your beehive on a regular basis but not too often. For beginners, every seven to 10 days during March and June is a good range. Inspecting more than weekly will make your bees unhappy. Every inspection disrupts their hive activity and sets them back a day.
To get ready for an inspection, don your bee suit or jacket and veil. Gather your smoker and hive tool. If you will be refilling feeders during the inspection, have them ready to refill. Light the smoker and wait for it to pump out nice, cool smoke for the bees.
Smoke in front of the hive, by the entrance, to confuse the guard bees. Lift the outer cover slightly and direct a few puffs of smoke underneath it. Let the cover back down gently and wait for one to two minutes for the smoke to take effect.
People often say smoke “calms” the bees, but what it really does is give them the signal that there is a fire nearby, which makes them gorge on honey. When they’re gorging on honey, they’re not worrying about the big, white-suited animal that is messing with them. When you see their little heads line up at the top bars, looking at you, it’s time for more smoke.
Remove the outer cover and carefully set it on the ground upside down. Direct some smoke into the hole in the inner cover, if you have one. Wait a minute or two for the bees to get the message.
Use your hive tool to gently pry up the inner cover and remove it. If there is wax or propolis on the inner cover, use your hive tool to scrape it off. Set the inner cover on top of the outer cover on the ground, being careful not to smash any bees.
Pry up the honey super (if your hive has one) using your hive tool. Lift off the super and set it on top of the inner cover.
Gently puff smoke into the second hive box, or second deep, if you have one. If you have three medium boxes instead of two deeps, you’ll just repeat this twice until you get to the bottom box. You will start your inspection with the bottom box.
Remove the second deep and place it gently on top of the super or inner cover. You will inspect this box it later.
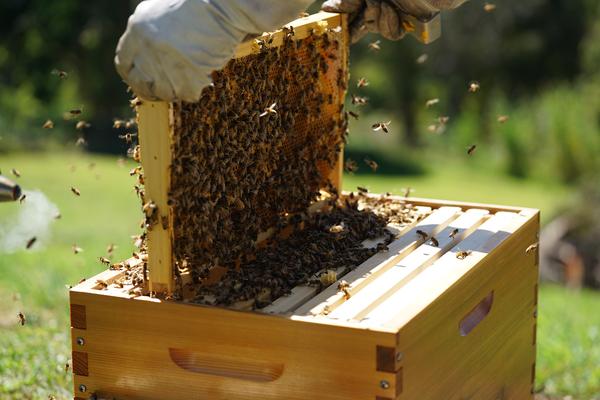
Direct smoke in between the frames in the bottom deep hive box. Remove the first frame and set it either in a frame holder or gently on top of the other hive boxes or the inner cover, taking care not to smash any bees.
Carefully pry each frame free using your hive tool, then lift up the frame and inspect it:
Try to identify the queen. This is easier if she’s marked, but it’s still possible if she isn’t. Look for her long, slender, unstriped abdomen and for a circle of workers around her. If you can’t find the queen, it’s important to find eggs, which indicate the queen was there in the past one to three days.
Check for any parasites or pests—mites, wax moth larvae, foulbrood, etc.
Determine how many frames are drawn out. When seven of 10 frames are drawn in the bottom deep, it’s time to add the second one. When seven of 10 are drawn in the second deep, add a honey super. If the honey super is close to full, add another one.
Identifying eggs is the most important part of the beehive inspection for the new beekeeper, but they can be difficult for beginners to find. Eggs look like thin grains of rice. There should be one per cell, laid in the middle of it. If you have more than one per cell, you have laying workers—consult an experienced beekeeper about this situation.
The best way to see eggs is to hold the frame tilted up toward the sky at about a 30-degree angle, with the bright sun shining over your shoulder. Hold it slightly to the side of you so that the shadow pattern of mesh from your veil doesn’t obscure the eggs.
Using reading glasses or a magnifying glass can also help. You can tilt the frame back and forth and experiment with the angle of the sun and the frame until you see them. The bottom center of the frame is usually the best place to positively identify eggs.
As you inspect each frame, put it into the open space left by the first frame you removed. Push each frame up against the one in front of it as you replace it—gently! You don’t want to squish any bees. Using a bee brush or smoke helps move the bees out of the way, especially at the frame ears where they are likely to get squished.
Inspect the frames in order, and don’t change the order of the frames during inspection. When you get to the final frame, push the whole set of frames together, using your hive tool, as one single unit, making space in the front for the first frame. Replace the first frame, then use your hive tool to even up the space on either side of the first and last frames so that the set of frames is centered in the box.
Replace the second hive box and inspect its frames, as with the bottom box. Then, replace the super if you have one. Use the bulldozer method: Start with the box on the back edge of the hive, sliding it forward slowly so as not to squish any bees. You can use the smoker or bee brush to gently move the bees out of the way, especially at the end when you are almost done sliding the box on.
Slide on the inner cover using the bulldozer method: Start at one end and slowly slide the cover across the box. Use the smoker or bee brush to move bees out of the way as needed.
Gently replace the outer cover on the hive. Finally, record your observations in your bee notebook or journal. Do this right away because it’s too easy to forget the exact date and the details of the inspection.
Remove your suit, and put away your smoker where it can burn out safely.